 |
|||||||||||||||
|
|||||||||||||||
1-800-946-3435 |
To receive discounts, coupons and special offers in your email Click Here!
|
|
|||||||||||||
|
|
|

Color Print Application Instructions
There are many benefits of using color prints, over painting the display yourself. One, in particular, is that the color print is a flawless reproduction of the original. The lines are crisp and sharp, the colors are impeccable, and the entire print is consistent. Even the best painter will show imperfections in their painting, but a color print is always perfect. If you want a perfect color display, and have little time to accomplish it, then you will want to use color prints on your holiday displays.
This is how it works
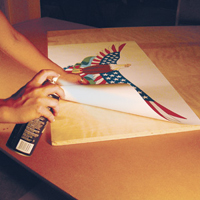 Glue the print down to your wood. To do this, use a good spray adhesive (one that sprays consistently, and allows you to peel back the print if you make a mistake, such as our Item #D-7203) to spray the wood and the back of the color print.
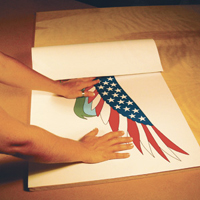 Carefully spread the print across the wood, starting at one side of the print, and gently pressing the print down and across the wood, with your hand. Make sure that you have pushed out any air bubbles. If air bubbles persist, don’t worry, you have a little time to gently, and very carefully, peel the color print back up, until you reach the air bubbles. Then, very carefully, continue to press the rest of the color print back down to the wood. Once the color print has been spread out and glued down to your wood, lightly press the print down to the wood. Let dry for a few hours, before cutting your wood.
 Once dry, using a jig saw or scroll saw, cut along the outline of the color print, so that the shape is all that remains. (For best results, apply two coats of #D-7002 Exterior Gloss Varnish before cutting. This will help protect the color print from the saw and reduce splintering along the edges. Then cut out the image.)
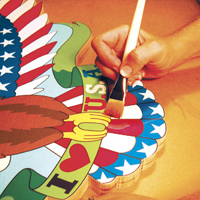 Now you must seal your display with an all-weather sealer. Get a really good sealer, such as the one we carry (#D-7002) Exterior Gloss Varnish. It seals the print and the wood, to keep out moisture, and also resists yellowing. Standard polyurethanes will yellow very quickly, which results in a very unsightly display. The gloss will ensure that your display will stay dry, with crisp, bright colors. Test the sealer to make sure that it doesn’t cause the colors to run. Apply several coats, making sure to seal the edges and back of the display. (For best results, and for a nicer look, after cutting our your image, paint the edges and the back with black paint. Let dry and apply another coat of varnish to the entire project. To help protect your paint from the sun, use Hydrocoate (#H-697) over the varnish. It has an ultra violet protector in it).
Now you are ready to display your project on your lawn. Attach wooden stakes to the back of your project and then into the ground. Or, to make it easy to stake into the ground (without the risk of ruining your display), use a staking kit. A staking kit makes it easy to attach the stake to the back of the display, as well as making it easy to release from the stake. Stake your display into the ground, and you are done!
So to recap, glue the color print down to the wood, cut on the outline of the image, seal your project, and stake it. You’re done in minutes, instead of hours or days. You just saved yourself huge amounts of time. The end result is that you ended up with a wonderful, professional-looking display. And best of all, this frees up your time to do many projects this weekend, or just to quickly do the one project that you have been putting off for weeks.
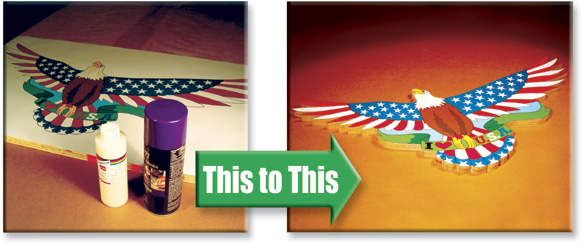
Hand-Painting vs. Sherwood's Color Prints
There are quite a few differences between painting displays yourself, and applying Sherwood's Color Prints.
- Color Prints have consistent lines and color. When hand-painting, there is no way to keep consistent outlines and even paint tones. Sherwood's Color prints assure you of a brilliantly-colored, even-toned colored display, consistently outlined.
- Color Prints take minutes, instead of hours, or days to hand-paint a display.
- When hand-painting many objects of the same size and shape, inconsistencies will occur. It is humanly impossible to paint the same objects over and over, and keep them the same size and shape. With Sherwood's Color Prints, since every print is computer-generated, you are assured of the fact that when multiple objects are meant to be the same shape and size, they will always, consistently be the same shape and size... no matter how many there are!
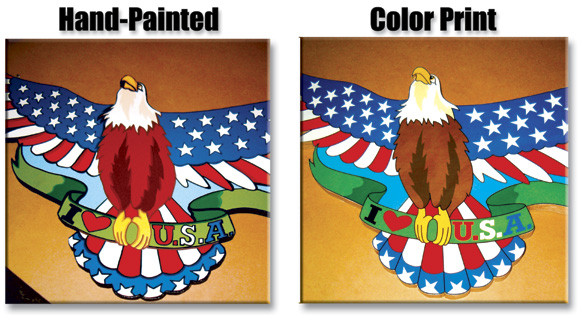
In the above comparison, notice that the Hand-Painted eagle has non-uniform stars, while the Color Print, on the right, has consistently sized and spaced stars. Also notice that the Hand-Painted eagle has inconsistent lines (varying thicknesses), while the Color Print's lines are exact and consistent. The "I Love U.S.A." in the Hand-Painted eagle is sloppy and wavers, while the Color Print is perfect.
CAUTIONS:
- When sawing, make sure you don’t put your hands and knees all over the color print. Instead, lay a protective cloth over the areas that you aren’t cutting. Do not walk on the color print.
- When sawing, cut slowly. A fast cut will cause the color print to tear.
- Try to keep sawdust off the color print as you saw, so that you don’t grind or scrape the print with the saw dust grains.
- For best results, add felt pads to the underside of your jig saw feet. This will protect the print while sawing.
- The red ink has a slight tendency to bleed into other colors, while applying the varnish. Try not to take your brush from the red areas to other, lighter areas (especially the white areas). Also, the more lightly you apply the varnish to the red areas, the less the red ink will bleed or smear.
- If sanding is required after cutting the design out of the wood, use a fine grit sandpaper or file, and sand downward from the color print to the back. Do not sand with the cut line, or from the back to the front, as this will ruin the color print and cause the edge to fray or tear.
If you would like details on what displays are offered in high-strength, full-color prints, please call toll-free (800) 843-2571. Sherwood offers all of the products listed above, at one location. Spray Adhesive (#D-7203), Exterior Gloss Varnish (#D-7002), Hydrocoate (#H-697), Large Staking Kit (#H-675), and Small Staking Kit (#H-672).